Creating a Work Center or Resource
The Transaction code to create a work center is CR01/CR02/CR03 and to create a resource is CRC1/CRC2/CRC3
Enter the values in the selection Screen:
Name of Work center / Resource -
Enter a Name using a planned nomenclature. The field length is 8 Characters; therefore the nomenclature for the work center or resource should be within those 8 characters. You can have the nomenclature as = PlantCode_0001 (0001 is a serial number) or you can directly give a 8 character name for the work center
Work center / Resource Category -
Enter a Work Center Category, which rightly defines the work center. The Categories for example are machine, Labor, Production Line, Labor
Plant -
Enter the Work center / Resource plant code where it is to be created. Work Centers / Resources belong to a plant. When you create a work center /Resource they define its capacity availability for production purposes.
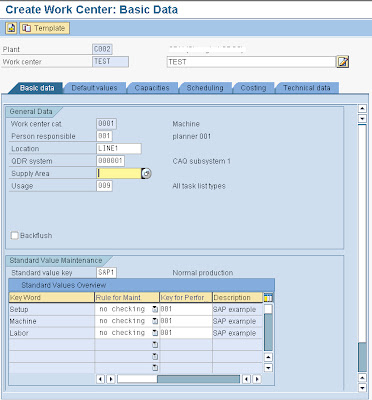
Enter the values in the Basic Data Screen (1st Tab):
Short Description -
This would be an around 40 character work center description.
Person responsible –
You may configure this field or choose from the standard available from the drop down field, I guess this field has no major implications. To configure the field values you can press F1 and in the pop-up box press the customizing option through which you can enter the configuration area for your project. It is not harmful if you use the pre-existing standard SAP configured values.
Location –
This field also has no major implications, though you may configure this field values as well. To configure the field values you can press F1 and in the pop-up box press the customizing option through which you can enter the configuration area for your project. It is not harmful if you use the pre-existing standard SAP configured values.
QDR System –
The QDR system is an important field when you are integrating the SAP PP/PPPI system with the shop floor legacy systems. This field gives you an option to map SAP with the legacy system, you have to configure this field values and enter the logical addresses of the legacy system for the SAP system to interact. To configure the field values you can press F1 and in the pop-up box press the customizing option through which you can enter the configuration area for your project.
Supply areas –
Again you have to configure the values for this field which helps you in KANBAN or Warehouse Modules. To configure the field values you can press F1 and in the pop-up box press the customizing option through which you can enter the configuration area for your project.
Usage –
Usage Field helps you decide in which task list - recipe, routing, maintenance task list, quality inspection plans etc, the work center or resource can be used.
Here you have to decide where you want to use the work center and thus restrict the use in other areas.
BackFlush -
In SAP PP/PPPI/REM, backflush helps you automatically issue quantities of certain components to the order during the order confirmation process. Normally backflush indicator is included in the material master MRP 2 View which tells the system that whenever the material is used in orders it should be backflushed, but if you are marking a work center as backflush then you are telling the system that when you are confirming the production at this work center for an order, all the components allocated to the work center should be backflushed.
I would recommend backflush indicator to be set at the component level in the MRP View.
Standard Value Key -
You can enter a configured standard value key which is a place holder for maximum of 6 parameters or activities which will help in capacity requirement calculations, scheduling and evaluating the planned costs of the order where the work center is used.
The Standard value keys brings in 6 parameters whose values are entered in the Routing or the Recipe, this standard values entered for a base qty will help in deriving the capacity, schedules, costs of the order.
The standard values can be (only 4 out of 6 are used here):
Machine time
Set-up time
Steam consumption
Electricity consumption
The Machine time and the set up time can be used in capacity, scheduling and costing formulas as parameters and eventually help in deriving the capacity, schedules and costs of the order.
Whereas, the Steam and Electricity parameters can be used in formulas which are designed to derive the steam consumption and electricity consumption costs.
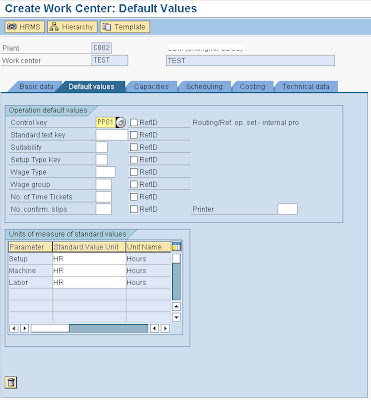
Enter the values in the Default Screen (2nd Tab):
Control Key –
You can default the control keys that would be used in the task lists operations and ultimately in the production orders.
Transaction code OP00 can be used to configure the control keys.
A control key holds controls such as:
§ Whether a work center should be scheduled.
§ Whether a work center should be cost derivations.
§ Whether a work center should derive the capacity requirements.
§ Whether a work center can have auto goods receipts posted from it. Such work centers are the last work centers in a sequence of operations laid in a routing or recipe.
§ Whether a work center can be subjected to quality inspection through the use of quality inspection characteristics assigned in a quality inspection plan.
§ Whether a work center is externally processed and not processed in house; in which case a purchase requisition will be created to send the process out for production, please note that if you are sending the process out for production, the purchase requisition is not created for any material code but it is created for the process description without the material code in the requisition.
§ Whether it should be allowed to carry out confirmations for the work center and if confirmations are allowed whether these confirmations types be operation wise confirmation or milestone confirmations. Milestone confirmation means that if you confirm a certain operation in a task list, it would automatically confirm all the operations above it or in other words it will confirm all the operations from this milestone operation to the earlier milestone operation only.
§ Whether you can print confirmations.
§ Whether you can print this work center when you are printing shop floor papers for the production order.
Standard Text –
Standard text identifies a text that is frequently used to describe certain processes. It is like a description given to the operation that would be carried out at the work center.
Defaulting UOM for the Standard Key assigned in the first basic data tab:
You can default the UOM of these parameters which will be brought in as defaults in the task list and in the order.
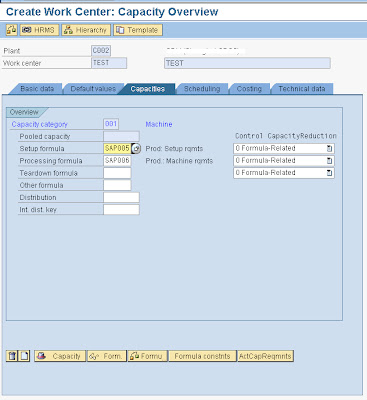
Enter the values in the Capacity Screen (2nd Tab):
Capacity has 2 screens appearing one after the other.
a) Capacity Overview screen
Capacity Category –
Enter a capacity category that was used when creating the work center. Normally this is the way you enter a value for the category, but you can differ here.
Pooled Capacity –
A Capacity created which can be used across many operations, for example a group of people who set up work centers before processing.
Other Formula –
Enter a formula for deriving the capacity requirements. This formula should necessarily use the parameters that you have entered through the standard value key, for example if you have Machine time, Set up time, Steam consumption, electricity consumption parameters, you can only use from this set of parameters.
Also verify whether you work center capacity formula is allowed for Capacity requirement generation; you have to check this indicator on when you are developing the formulas in the configuration and if you are using a predefined SAP formula you can verify this by displaying the formula (in Extras à Formula à Display)
Capacity Formula Example:
The formulas for capacity requirement / Scheduling requirement can be:
Example 1 - For regular qty based work center or resource
= [Setup + {(Production order Qty X Machine Time consumed) / Base Quantity}]
Example 2 - For a work center or resource which processes more than one quantities at one given time schedule (for example a casting machine)
= {Set-up Time + [{Volume of Base Qty / Base Qty X (Production Order qty - 1)} / {Volume of Furnace + 1}] X Furnace Time}.
In this case
Recommendations:
For Regular production in SAP PP or SAP PPPI you can use SAP006 – Machine Requirements
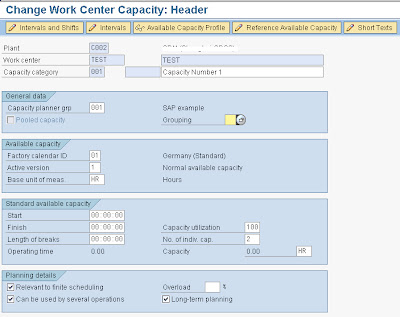
b) Capacity Header Screen
Capacity Planner Group and Grouping –
You can use a standard Capacity planner group provided by SAP or create your own. The Planner group is responsible for handling this capacity. Such fields are useful when drawing reports.
Factory Calendar ID / Active Version –
Using Transaction code SCAL, you can design your factory calendar, which will contain the holidays and validity of calendar.
A factory calendar is very important unit in a work center as it helps in disallowing planning (production, procurement) on holidays.
Keep Active version = 01
Base unit of Measure –
Start time / Finish time / Length of Breaks / Capacity Utilization / Number of individual capacities / Capacities Unit –
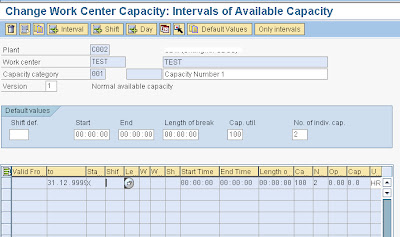
If you are not maintaining the shift schedules and shift sequences, through the use of “intervals of available capacity”, then you have to enter the start time, finish time, break length, capacity utilization percentage and the number of individual capacities in the work center along with the unit of measure for the capacity. Once you enter these details the system calculates the operating time available in a day.
When you enter these values for a work center or resource you are assuming that for each day throughout the life of the plant the work center will work for a particular start time to end time with a given break time for the number of machines or people (individual capacities) and for a capacity utilization.
But if you differ from the above statement and your available time changes with respect to seasons or periods, then you can either define the available capacities through the use of shifts sequences defined in configuration or define the shifts and time manually in the “intervals of available capacity screen”.
If you plan to maintain through the use of Intervals of available capacity, then you can do so by clicking on the Button – “intervals of available capacity” on the capacity header screen. On the “Intervals of available capacity” screen, you can the “+ Intervals” button to enter the configured shift sequence and thus pull in the predefined daily shift schedules or enter the daily schedules and shift details for a period manually.
Capacity relevant to finite scheduling -
If you want the system to take the available capacity and the load of this capacity into account during finite scheduling then you select this indicator. Also when you are interested in carrying out SAP ECC Capacity availability checks you should select this indicator.
Other uses are – Mandatory selection of this indicator, if using finite scheduling based planning methods in APO.
I would always select this indicator for all my work centers or resources no matter what!
Several operations can use capacity -
This indicator if selected allows you to process other orders on the same work center to consume the remaining available capacity. This should always be selected – preferably.
I would always select this indicator for all my work centers or resources unless and untill you dont want other orders to use it.
Long term planning -
Select if you are using this work center for long term planning purpose. The goal of long-term planning is to determine material requirements and capacities for assemblies and raw materials based on a simulated demand program containing independent requirements.
Similarly I would always select this, there is no harm in selecting it.
Enter the values in the Scheduling Screen (3rd Tab):
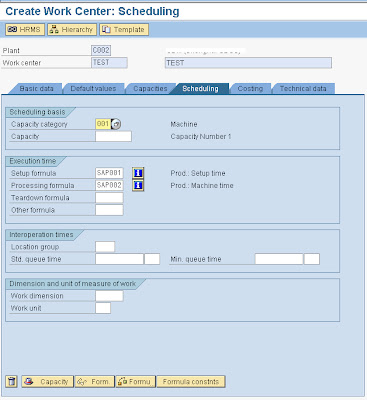
Capacity Category:
Enter a capacity category entered in the capacity overview screen. The capacity category enables you to determine whether it is machine or labor capacity.
Other Formulas:
Enter a formula for deriving the Schedules. This formula should necessarily use the parameters that you have entered through the standard value key, for example if you have Machine time, Set up time, Steam consumption, electricity consumption parameters, you can only use from this set of parameters.
Also verify whether you work center Scheduling formula is allowed for Scheduling requirement generation; you have to check this indicator on when you are developing the formulas in the configuration and if you are using a predefined SAP formula you can verify this by displaying the formula (in Extras à Formula à Display)
Scheduling Formula Examples:
The formulas for Scheduling requirement can be:
Example 1 - For regular qty based work center or resource
= [Setup + {(Production order Qty X Machine Time consumed) / Base Quantity} / Splits]
Example 2 - For a work center or resource which processes more than one quantities at one given time schedule (for example a casting machine)
= {Set-up Time + [{Volume of Base Qty / Base Qty / Splits X (Production Order qty - 1)} / {Volume of Furnace + 1}] X Furnace Time}.
Recommendations:
For Regular production in SAP PP or SAP PPPI you can use SAP002 – Machine Time.
Enter the values in the Costing Screen (4th Tab):
Start date / Finish date of Work Center –
This is the start validity date and the end validity date of the work center.
Normally the work center validity start date, cost center validity start date, the activity validity start date and the Routing Validity start date and the BOM validity start date should be kept as one.
Cost Center –
Defines the cost center where all the activity costs will be collected. Every work center which should collect activity costs should have a cost center. The cost centers are created by the SAP CO consultants.
Activities Assigning –
All the parameters or the activities defined in the Standard Value key should hold a formula next to it to derive the activity costs.
Normally the capacity requirements formulas can be used here for costing purposes unless and until the costing team does not have any other specific formulas for costing purposes.
All the formulas should be allowed for costing, you can check this while configuration or you can check this in the work center itself by using the path Extras à Formula à Display.
For example –
Set-up time = SAP001 – Set up Time
Machine time = SAP006 – Machine Requirements
Steam Consumed = ZSTEAM – Steam Consumed
Electricity Consumed = ZELEC – Electricity Consumed
i.e.,
SAP001 = Set up Time
SAP006 = Machine * Operation quantity / Base quantity
ZSTEAM = Steam Consumed parameter * Operation quantity / Base quantity
ZELEC = Electricity Consumed parameter * Operation quantity / Base quantity
